Can You Just Grout Over Old Grout? A Hard Look At A Common Shortcut

You should not grout over old grout. New grout will not adhere properly to the old, non-porous surface. This thin new layer will quickly crack, crumble, and fail. For a durable and long-lasting repair, you must first remove at least two-thirds of the old grout’s depth before applying new material.

Let’s get this out of the way immediately: No. You absolutely should not grout over old grout.

It’s tempting, I get it. You see discolored, cracked lines, and the idea of just slathering a fresh, clean layer on top sounds like a perfect weekend fix. But in practice, it’s a guaranteed failure. The new, thin layer will crack and flake off, sometimes in a matter of weeks, leaving you with a bigger mess than you started with. For a repair that actually lasts, you have to dig in and remove at least two-thirds of the old grout’s depth. There are no two ways about it.

You can read below for our guide, but for a pro job, make sure give us, Mayfair Building Group a call.

removing old grout

The Core Problem: Why Skim-Coating Grout is Doomed

Applying new grout over old isn’t just a bad idea; it’s fundamentally flawed from a materials science standpoint. This isn’t a matter of technique or luck; it’s physics, and the physics are working against you.

The key thing to understand is adhesion. Fresh, wet grout needs something porous to bite into. When you do a proper grout job, the material doesn’t just sit between the tiles; it mechanically interlocks with the rough, unglazed edges of the tiles and the substrate below. Cured grout, on the other hand, is a dense, non-porous, sealed surface. Trying to stick new grout to it is like trying to glue two pieces of glass together with school glue. There’s no physical grip.

This creates a weak, superficial bond that will pop loose with the slightest provocation—the normal expansion and contraction from temperature changes, tiny shifts in the subfloor, or just the impact from regular foot traffic.

And then there’s the structural issue. Grout is engineered to have a certain mass and depth to achieve its compressive strength. The entire process of curing relies on a chemical reaction called hydration, where the cement particles bond with water. When you apply grout as a paper-thin “skim coat,” it dries out way too fast. Proper hydration never occurs. Instead of a hard, durable material, you get a brittle, chalky layer that chips and flakes away with embarrassing speed. It’s a recipe for failure.

Thinking Through Your Options: A Reality Check on Grout Refreshment

Before you grab a tool, you need to decide what you’re actually trying to accomplish. Are you fixing damage or just changing the look? The right approach depends entirely on the state of your existing grout.

  • The Shortcut (Grouting Over): We’ve covered this. You apply a thin layer on top of the old stuff. Adhesion is terrible, durability is non-existent, and it almost always looks lumpy and amateurish. The old, discolored grout can even bleed through, making the color splotchy. Don’t do it.
  • The Professional Method (Complete Removal): This is the only way to go for a lasting repair or a true color change. You grind out at least 2/3 of the old grout’s depth. This is crucial—it exposes the porous tile edges, giving the new grout the anchor it needs to form a powerful mechanical bond. The result is a clean, durable, water-resistant joint that sits at the correct depth and looks professional. It’s labor-intensive, but it’s the right way.
  • The Cosmetic Fix (Grout Colorant/Stain): What if your grout is in good shape—no cracks, no crumbling—but you just hate the color? This is where a colorant comes in. It’s essentially a specialized epoxy paint for grout. You meticulously clean the existing lines and then paint over them. It’s not a structural fix… it does nothing for damaged grout. But for a purely aesthetic change, it’s a fantastic, low-mess alternative to a full re-grout. Its durability can vary, maybe lasting a few years in a high-traffic area, but it’s a solid option.
  • Spot Repairing: You can just dig out a few damaged sections. The trick here is color matching. Grout color changes slightly as it ages and is exposed to cleaning products, so getting a perfect match between a new patch and the old surrounding grout is notoriously difficult. It often looks… well, patched.

The Real Process: A Technical Guide to Replacing Grout

So you’ve decided to do it the right way. Excellent. This is a job where preparation and the right tools make all the difference between a professional result and a pile of chipped tiles.

Step 1: Gearing Up (Tools & Prep)

Your choice of tool is a balance between speed and control.

Manual Tools (The Slow and Steady Approach) For smaller jobs or anyone nervous about damaging tile, manual is the way to go. You have maximum control, which is everything.

  • Grout Rake/Saw: Your main workhorse. Get one with carbide blades; they last much longer.
  • A triangular carbide scraper is a lifesaver for corners.
  • Utility knife for scoring tough lines. This method is a workout, there’s no denying it, but it produces far less hazardous dust.

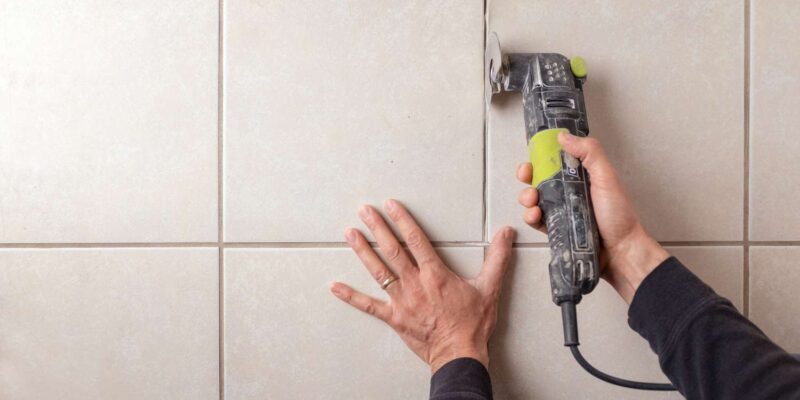
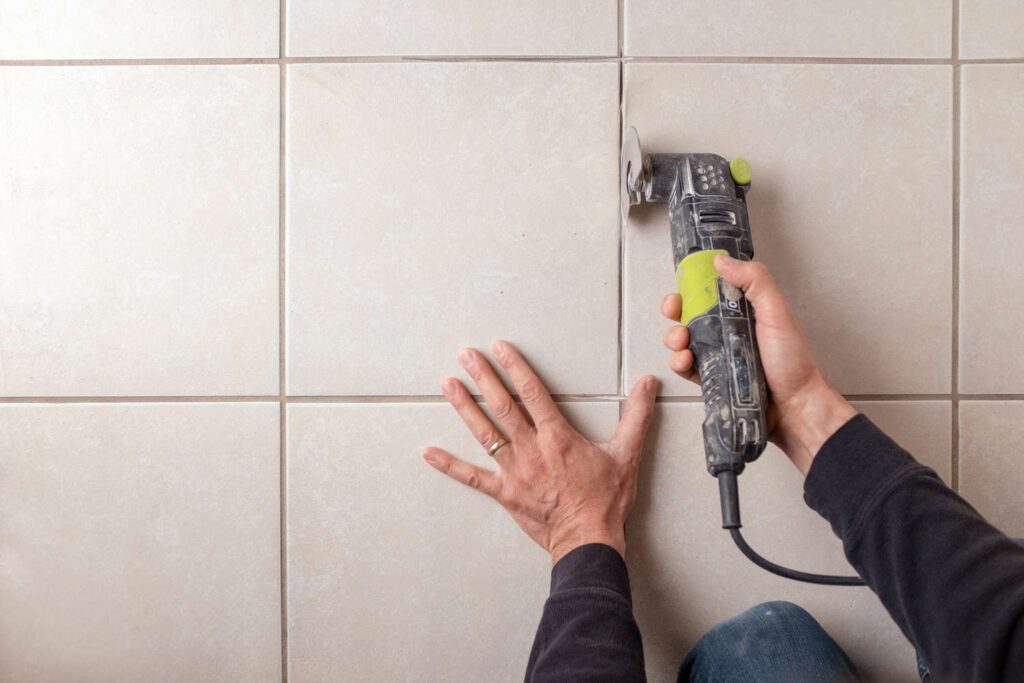
Power Tools (The Fast, But Risky, Approach) For big floors, power tools are a necessity unless you have a week to kill. But they demand respect. One slip and you’ve chipped a tile.

  • Oscillating Multi-Tool: This is the go-to for most pros. The vibrating blade offers a great mix of speed and manageable control. Still, you have to be careful. Start on a low speed to get a feel for how it cuts.
  • Rotary Tool (like a Dremel) with a grout bit. Fast, but can be hard to control the depth.
  • Angle Grinder: Honestly, unless you’re a seasoned pro working with wide joints, just leave this one alone. It’s incredibly aggressive.

Safety & Workspace Prep (This is Not Optional) We need to talk about silica dust. When you grind out cementitious grout, you’re aerosolizing crystalline silica, which is seriously hazardous to your lungs.

  • A NIOSH-approved respirator (N95 at a minimum, P100 is better) is mandatory. A simple paper mask does nothing.
  • Safety glasses. Grout chips will fly.
  • Use painter’s tape to protect the edges of delicate tiles.
  • Plastic sheeting and a shop vac with a HEPA filter are your best friends for containing the mess. Keep that vacuum running right next to your tool as you work.

Step 2: The Removal

The goal here is simple: remove at least two-thirds of the grout depth, consistently.

Why two-thirds? That’s the magic number, according to industry bodies like the TCNA, that ensures the new grout has enough mass to cure correctly and enough surface area on the tile edges to bond to. Anything shallower, and you’re back in the “brittle, cracking layer” territory we talked about.

After you’ve removed the grout, the cleanup is critical. Any leftover dust or debris in the joints will act as a “bond breaker,” preventing the new grout from adhering properly. Vacuum every single line thoroughly with a crevice tool. Then, wipe them down with a slightly damp sponge (not wet!) to pick up the last of the fine dust. Let everything dry completely before you even think about mixing your new grout.

Changing Grout Color: The Strategic Decision

If your goal is purely aesthetic, you have two very different paths.

Method 1: Grout Colorants & Stains

This is the path of least resistance. A colorant is a topical, epoxy-based coating that you paint directly onto your existing, structurally sound grout. The key here is “structurally sound.” If your grout is crumbling, this won’t fix it. But if it’s just stained or an ugly color, a colorant is a game-changer. It not only changes the color but also seals the grout line, making it stain and water-resistant. The application is tedious, you’re basically doing a tiny paint job with a small brush, but it’s worlds easier and cleaner than a full removal.

Method 2: Total Grout Replacement

This is the only choice if your existing grout is damaged or if you want the most permanent, durable color change possible. By following the full removal and re-grouting process, you’re essentially getting a brand-new grout job. This also opens up the possibility of upgrading your grout material itself, say, from a standard cementitious grout to a high-performance epoxy. It’s the most work, but the results are impeccable and will last for decades.

How to Think About Grout Color

Choosing a grout color isn’t just about what looks good on a sample stick. It has a huge impact on the final look and the long-term maintenance of your tile.

Contrast is Everything

  • High-Contrast (e.g., black grout on white subway tile): This makes the individual tile shape the star of the show. It creates a bold, graphic pattern. It’s a strong design choice that defines the grid.
  • Low-Contrast (e.g., tan grout on beige tile): This is the opposite approach. It blends the grout lines away, creating a more seamless, monolithic surface. The focus shifts from the pattern to the overall texture of the tile field. This can make a small space feel larger.

The Practicality of Color A lot of people default to white grout for that “clean” look. In reality, unless it’s a rarely used wall, pure white grout is a maintenance nightmare. A light or medium gray is often a much better choice. It gives you a similar clean, neutral look but is far more forgiving of everyday dirt.

  • White/Light Grout: Looks crisp, but shows every single speck of dirt, mold, and mildew. Requires diligent sealing and frequent cleaning.
  • Dark Grout: Hides dirt beautifully. The trade-off is that it can show efflorescence (a white, powdery mineral deposit) more clearly and can sometimes be faded by harsh cleaners.
  • Mid-Tones (Grays, Tans): The sweet spot. These colors are brilliant at camouflaging dirt and are generally the lowest-maintenance option.

Choosing the Right Grout Product

The grout itself matters. The two main families are cementitious and epoxy.

Cementitious Grout: The classic choice. It’s a Portland cement-based powder you mix with water.

  • Sanded: For joints 1/8″ or wider. The sand is a critical aggregate for strength and to prevent shrinkage cracks.
  • Unsanded: For narrow joints (less than 1/8″). It’s a smoother mix that can pack into tight spaces. You also must use unsanded with materials that scratch easily, like polished marble or glass. Most modern cement grouts are polymer-modified, which improves their flexibility and water resistance, but they are fundamentally porous and must be sealed after curing.

Epoxy Grout: This is the high-performance option. It’s a two-part system with a resin and a hardener. Once mixed, a chemical reaction starts, and you have a limited time to work with it.

  • The big advantage: Epoxy grout is non-porous. It doesn’t need sealing. It’s incredibly stain- and chemical-resistant, making it the undisputed champion for kitchen countertops, high-traffic entryways, or shower floors.
  • The downsides: It’s more expensive and significantly trickier to install. The cleanup process is less forgiving than with cement grout. If you leave a haze on the tile, it’s a nightmare to remove once it cures.

Your choice should depend on location. For a shower floor, the extra cost and effort of epoxy are almost always worth it. For a decorative backsplash, a quality polymer-modified cement grout is perfectly adequate.

The Final Stretch: Applying the New Grout

You’ve done the hard work of removal. Now, for the payoff.

Mixing and Application

  • Follow the manufacturer’s directions to the letter. Add the powder to the specified amount of cool water (not the other way around) and mix to a smooth, peanut butter consistency.
  • Let it “slake” or rest for 5-10 minutes. This is a critical step that allows the chemicals to fully activate.
  • Remix briefly, without adding more water, and you’re ready.
  • Use a grout float held at a 45-degree angle, and spread it diagonally across the joints. This diagonal motion forces the grout down into the joint. Work in small, manageable sections.

Cleaning and Curing This is where finesse comes in.

  • After about 15-30 minutes, the grout will set up slightly. Use a barely damp (well wrung-out!) grout sponge to gently wipe the excess off the tile surface, again, moving diagonally.
  • Rinse your sponge constantly in a bucket of clean water. Be careful not to be too aggressive and pull grout out of the joints.
  • After a couple of hours, a slight haze will form on the tiles. Buff it off with a dry microfiber cloth.
  • Let the grout cure completely, which can take up to 72 hours. Keep it dry during this time.
  • If you used cementitious grout, your final step, after the full cure, is to apply a good quality penetrating sealer. This is what will protect it from stains and moisture down the road.

Common Questions, Straight Answers

We get asked these questions all the time.

Will just adding a new layer of grout make my tiles look better?

No, it will make them look worse. The job will look bulky and uneven, and when that thin layer inevitably cracks and flakes off, it will look far worse than the old grout you were trying to hide.

Is there any way to change my grout color without all that removal work?

Yes. If the current grout is structurally sound (not crumbling), a grout colorant is the way to go. It’s a topical product that works like paint, effectively changing the color and sealing the surface in one go.

Why is removing the old grout so important for the job to last?

It all comes down to creating a proper bonding surface. The new grout needs to grip the porous edges of the tile itself. A thin layer on top of old, sealed grout has nothing to hold onto, so it’s guaranteed to fail. You have to create a deep enough channel for the new material to form a strong, lasting mechanical lock.

Hot Water Systems Have a Lifespan – How Long Do They Last?

Understanding how long hot water systems last is important for making informed decisions about maintenance, replacement, and long-term investment in your home. On average, a hot water system’s lifespan ranges from 8 to 12 years, depending on the type, usage, and maintenance.

Types of Hot Water Systems and Their Expected Lifespan

Electric Hot Water Systems

Electric hot water systems are among the most common in residential settings. Typically, these systems have an average lifespan of 10 to 15 years. The longevity of electric systems depends heavily on the quality of the heating elements and the tank itself. Regular maintenance, including flushing the tank to remove sediment buildup, is essential to prolong the lifespan of these systems.

Gas Hot Water Systems

Gas hot water systems usually last between 8 and 12 years. These systems use a gas burner to heat water and are generally more energy-efficient than electric systems. However, they require careful consideration of the installation quality and regular maintenance to avoid major problems, such as the buildup of sludge or sediment, which can significantly impact their lifespan.

Solar Hot Water Systems

Solar hot water systems have a longer average lifespan, typically between 15 and 20 years. These systems use solar panels to heat water, making them more environmentally friendly and cost-effective in the long run.

However, the lifespan of a solar hot water system can be affected by factors like water quality and the efficiency of the solar panels. Regular inspections and maintenance are IMPORTANT to ensure the system is functioning correctly and to avoid any potential issues that could shorten its life expectancy.

Tankless Hot Water Systems

Tankless systems, also known as continuous flow systems, can last up to 20 years. These systems provide hot water on demand, which reduces wear and tear compared to storage tank systems. However, the longevity of tankless systems depends on regular maintenance and timely repairs. Hard water can cause buildup inside the system, so ensuring good water quality is vital.

Factors Influencing Hot Water System Lifespan

Quality of Installation and Materials

The installation quality of your hot water system plays a significant role in its lifespan. Poor installation can lead to issues such as leaks, inefficient heating, and premature failure of components. It is essential to hire a licensed plumber to ensure the system is installed correctly. The materials used in the system, such as enamel-lined tanks and high-quality heating elements, also impact longevity.

Water Quality

Water quality is another critical factor that affects the lifespan of hot water systems. Hard water, which contains high levels of minerals, can lead to sediment buildup in the tank and pipes, causing corrosion and reducing efficiency. Installing a water softener can help mitigate these issues and extend the useful life of your hot water system.

Usage Patterns

Usage patterns significantly impact the lifespan of hot water systems. Systems in larger households or those with high hot water demand where bathrooms are used very regularly or kitchens with a dishwasher for example. will experience more wear and tear than those in smaller households. Additionally, colder climates can put more strain on the system, as it has to work harder to heat the water.

Maintenance Tips to Extend Lifespan

Regular Maintenance

Regular maintenance is crucial for extending the lifespan of your hot water system. This includes flushing the tank annually to remove sediment, checking and replacing the anode rod, and inspecting the system for leaks or other issues. Regular inspections by a licensed plumber can help identify and address potential problems before they become major issues.

Timely Repairs

Addressing issues as soon as they arise is vital for maintaining the efficiency and longevity of your hot water system. Ignoring problems like strange noises, leaks, or inconsistent water temperature can lead to more severe damage and costly repairs. Timely repairs ensure that the system continues to function correctly and efficiently.

Signs of a Failing Hot Water System

Common Indicators

Several signs indicate that your hot water system may be nearing the end of its life. These include rusty or discoloured water, which can indicate corrosion inside the tank, and strange noises, which may suggest sediment buildup or other internal issues. Other signs include inconsistent water temperature, reduced hot water supply, and increased energy bills.

When to Replace

Determining when to replace your hot water system requires careful consideration of its age, condition, and performance. If your system is over 10 years old and experiencing frequent issues, it may be more cost-effective to invest in a new system rather than continuing to pay for repairs.

Comparing Lifespan of Different Brands

Brand-Specific Lifespan

Different brands of hot water systems offer varying levels of reliability and longevity. Researching and comparing the lifespan and performance of various brands can help you make an informed decision. Consumer reviews and expert opinions can provide valuable insights into the most reliable hot water heaters on the market today.

Warranties and Customer Service

When selecting a hot water system, consider the warranties and customer service offered by different manufacturers. A good warranty can provide peace of mind and protect your investment, while responsive customer service can help address any issues that arise during the system’s lifespan.

Cost Analysis and Replacement Considerations

Replacement vs Maintenance

Deciding whether to replace or maintain your hot water system involves weighing the costs and benefits. While regular maintenance can extend the system’s lifespan, there comes a point when replacement is more cost-effective. Consider the long-term savings of an energy-efficient model, which can reduce operating costs and provide better performance.

Financing Options and Rebates

Investing in a new hot water system can be expensive, but various financing options and rebates are available to help offset the cost. Many energy companies and government programs offer incentives for installing energy-efficient systems, such as solar systems or heat pumps.

Environmental Impact of Hot Water Systems

Sustainability Considerations

Hot water systems can have a significant environmental impact, particularly in terms of energy consumption and greenhouse gas emissions. Choosing an energy-efficient system, such as a solar hot water system, can reduce your carbon footprint and contribute to a more sustainable future.

Reducing Carbon Footprint

There are several ways to reduce the environmental impact of your hot water system. Installing a heat pump or solar panels can significantly decrease energy usage. Additionally, ensuring proper maintenance and addressing issues like sediment buildup can improve the system’s efficiency and reduce waste.

Final Notes

Summary of Key Points

In summary, the lifespan of hot water systems varies depending on the type, installation quality, water quality, and maintenance. Electric hot water systems typically last 10 to 15 years, while gas hot water systems have a lifespan of 8 to 12 years. Solar hot water systems and tankless systems can last 15 to 20 years or more with proper care. Regular maintenance, timely repairs, and addressing key factors such as water quality and usage patterns are essential for extending the system’s lifespan.

Making Informed Decisions

When considering whether to repair or replace your hot water system, it’s important to evaluate its age, condition, and performance. Investing in a new, energy-efficient system can provide long-term savings and environmental benefits.

By understanding the factors that affect the lifespan of hot water systems and taking proactive steps to maintain and care for your system, you can ensure reliable hot water and make informed decisions that benefit both your home and the environment.

mold damage to a wall

Preventing Mold After Water Damage Or Flooding In Your Home

Recently, the team at Mayfair Building Group undertook bathroom repairs on a home in Adelaide with water damage from a shower water leak into a wall.

Flooding and water damage can create a suitable environment for mold growth, posing serious health risks and structural damage to your property. Mold can cause allergic reactions, respiratory issues, and even death in severe cases.

Acting quickly is important to prevent mold and mitigate further damage. We discuss the steps for mold prevention and repair after a flood.

Below are some images of the recent damage and after a shower leaked into a wall.

Understanding Mold and Its Dangers

Mold is a type of fungus that thrives in damp areas with high humidity levels. It spreads through mold spores which can trigger allergic reactions and affect indoor air quality. Black mold (Stachybotrys chartarum) is particularly hazardous, and prolonged mold exposure can lead to severe health problems.

Health Risks:

  • Allergic reactions: Symptoms include sneezing, runny nose, red eyes, and skin rash.
  • Respiratory issues: Asthma attacks, chronic cough, and respiratory infections.
  • Toxic effects: Some molds produce mycotoxins that can cause neurological problems and even death.

Immediate Steps After Flooding

Act quickly to prevent mold growth. Here are the immediate steps to take:

  1. Ensure Safety: Wear gloves and a mask before entering the affected area.
  2. Remove Standing Water: Use a wet dry vacuum to eliminate any standing water.
  3. Dry the Area: Utilise dehumidifiers, fans, and heaters to reduce moisture and lower the relative humidity.
  4. Discard Damaged Items: Remove and dispose of wet items, wet insulation, and any porous surfaces like carpets and ceiling tiles that are water damaged.
  5. Clean and Disinfect: Clean non-porous surfaces with a solution that kills mold and prevents mildew growth.

Drying and Dehumidification

Effective drying and dehumidification is pretty important in preventing mold.

Steps for Drying:

  • Increase Airflow: Open windows and doors to promote air circulation. Use fans to enhance airflow.
  • Use Dehumidifiers: Place dehumidifiers in the affected area to extract moist air. For larger spaces, a larger model may be necessary.
  • Maintain Low Relative Humidity: Aim for low relative humidity (below 60%) to inhibit mold growth.
  • Target Hidden Areas: Ensure thorough drying of hidden areas like behind walls and under floors.

Importance of Dehumidification:

  • Reduces moisture in the air.
  • Prevents the spread of mold spores.
  • Ensures the drying process is complete, avoiding further damage.

Cleaning and Disinfecting

Thorough cleaning and disinfecting help eliminate mold spores and prevent mold growth.

Cleaning Steps:

  • Hard Surfaces: Scrub with a mixture of water and detergent. Use bleach sparingly as it can spread mold if not properly used.
  • Porous Surfaces: Remove and dispose of items like carpets and upholstery that cannot be thoroughly cleaned.
  • Disinfect: Use registered disinfectant that kills mold and prevents mildew growth.

Key Areas to Clean:

  • HVAC System: Clean and disinfect to prevent the spread of mold spores through the air.
  • Walls and Floors: Ensure all surfaces are clean and dry.
  • Wet Insulation: Replace any insulation that has become water damaged.

Repairing and Replacing Damaged Materials

Repairing and replacing water-damaged areas is essential to prevent mold growth.

Steps for Repairing:

  • Assess the Damage: Conduct a thorough inspection to identify visible mold and hidden areas of damage.
  • Remove Damaged Materials: Safely remove water-damaged drywall, flooring, and other building materials.
  • Replace and Repair: Install new materials to replace those that were removed. Ensure all replacements are dry and mold-free before installation.
  • Improve Ventilation: Add vents or windows to improve air circulation and reduce humidity levels.

Materials to Focus On:

  • Ceiling Tiles: Replace any that show visible discoloration or damage.
  • Walls: Check for mildew growth and replace affected drywall.
  • Flooring: Remove and replace water-damaged carpets and floorboards.

Professional Mold Remediation

In severe cases, hiring a professional mold remediation company is necessary. Talk to us on how we can provide this service.

When to Hire Professionals:

  • Extensive Mold Growth: If the mold problem covers a large area or is particularly severe.
  • Health Concerns: If you or your family are experiencing health issues related to mold exposure.
  • Insurance Claims: When dealing with significant water damage that may involve your insurance company.

Choosing a Professional:

  • Request Mold Testing: Professional mold inspectors can conduct mold inspection and mold testing to determine the extent of the infestation.
  • Get Multiple Quotes: Compare prices and services to select the best option.

Benefits of Professional Remediation:

  • Expertise: Professionals have the knowledge and equipment to handle mold removal effectively.
  • Thoroughness: Ensures all mold is removed, reducing the risk of recurrence.
  • Peace of Mind: Professional work guarantees a mold-free home.

Prevention Tips for the Future

Long-Term Mold Prevention Strategies:

  1. Control Humidity Levels: Maintain indoor humidity below 60%. Use dehumidifiers and air conditioners to control moist air.
  2. Fix Water Leaks: Address leaks in roofs, walls, and plumbing promptly to prevent water exposure.
  3. Improve Ventilation: Ensure good ventilation in kitchens, bathrooms, and basements. Use exhaust fans to remove moisture.
  4. Regular Inspections: Conduct regular mold inspection to catch issues early. Look for signs like musty smell or visible mold.
  5. Use Mold-Resistant Products: When renovating, choose mold-resistant drywall, paint, and insulation.

Tips for Preventing Mold:

  • Keep Areas Dry: After a spill or leak, dry the area within 24-48 hours to prevent mold growth.
  • Monitor Humidity: Use a hygrometer to measure and maintain low relative humidity levels.
  • Regular Cleaning: Clean and disinfect hard surfaces and non-porous surfaces regularly.
  • Proper Storage: Store items in dry areas to avoid water damage.
  • Use Mold Inhibitors: Add mold inhibitors to paints and other coatings used in damp areas.

Seasonal Tips:

  • Summer: Use air conditioners to dehumidify and cool the air.
  • Winter: Use a dehumidifier in the basement and other damp areas.

Final Points

Preventing and repairing mold damage requires swift action and thorough methods. By understanding the dangers of mold, taking immediate steps after flooding, effectively drying and cleaning, repairing damaged materials, considering professional help, and implementing long-term mold prevention strategies, you can protect your home and health.

Regular inspections and maintenance are important to keep your living environment safe and mold-free.

cleaning a drain with baking soda

The Best Ways To Fix Smelly Bathroom Drains

You’ve probably encountered it before – that unpleasant, persistent smell wafting from your bathroom floor drain. It’s more than just a minor annoyance; it can make your entire home feel less clean and welcoming.

The best way to fix smelly bathroom floor drains, is to use a professional drainage service that offers a comprehensive approach, including inspections, cost estimation, emergency services, and maintenance agreements.

But don’t worry, you’re not stuck with the stench forever. This guide will help you:

  • Identify the source of the odour
  • Teach you regular cleaning practices
  • Suggest natural remedies to eliminate the smell
  • Point out when to call in professional services

We’ll also provide preventive measures to keep that pesky smell from returning.

So let’s roll up our sleeves and get rid of that smelly bathroom floor drain for good!

Key Takeaways

  • Identifying the source of the odour is crucial for finding the right solution.
  • Regular drain cleaning procedures, including the use of chemical solutions and DIY methods, help prevent odours.
  • Natural remedies such as baking soda, vinegar, lemon juice, essential oils, and used coffee grounds can eliminate odours.
  • Professional drainage services offer a comprehensive approach, including inspections, cost estimation, emergency services, and maintenance agreements.


a smelly bathroom drain

Identifying the Source of the Odour

Before you tackle that foul smell, it’s crucial to pinpoint where it’s actually coming from. Is your bathroom floor drain the culprit? Let’s find out!

Odour origin can be a tricky task, but with careful observation and some detective work, you’ll soon figure it out.

Start by closely inspecting your bathroom floor drain. You’re looking for signs such as sewage backup or pipe leakage which could lead to unpleasant odours. Sewage backup often manifests as a gurgling sound in the drain or water backup during flushing of toilets or running sinks, while pipe leakage typically leaves wet spots around your flooring.

Next up is checking for mold growth around the area. Mold thrives in damp places and gives off a musty odour which may be mistaken for sewer-like smells.

Don’t forget about potential animal infestation too! Small rodents can sometimes make their way into drains and die there, leading to a nasty stench.

So remember – effective problem-solving always begins with correctly identifying the problem source! Whether it’s sewage backup, pipe leakage, mold growth, or even an unfortunate critter stuck in your drains – knowing what you’re dealing with will guide you towards the right solution for that smelly bathroom floor drain.

Regular Drain Cleaning Procedures

Regular drain cleaning procedures are essential for maintaining a well-functioning plumbing system and eliminating foul odours. This applies to all drain outlets, including bathroom floor drains. Developing a cleaning routine that suits the usage level of your bathroom is important. For less used bathrooms, monthly cleanings may be sufficient, while high-traffic ones may require weekly cleanings. Regardless of the frequency, having a clear plan is essential.

There are different methods you can use for drain cleaning. Chemical solutions are available and can be effective against grime and odour build-up. However, it’s important to follow safety precautions when using these products, such as wearing gloves and goggles to protect your skin and eyes.

If you prefer more DIY methods, you can try using baking soda and vinegar concoctions. Just make sure to check the compatibility of these materials with your drain pipes to avoid any accidental damage.

Remember to consistently perform these cleaning procedures. Regular drain cleaning not only helps prevent unpleasant odours but also contributes to the overall cleanliness of your bathroom.


a plumber cleaning a bathroom drain


Natural Remedies for Odour Elimination

Imagine coming home after a long, hard day to a fresh and inviting atmosphere – that’s the magic of natural remedies for odour elimination. If your bathroom floor drains are giving off a less than desirable smell, there’s no need to fret. There are numerous natural remedies you can use to combat this issue:

  • Baking soda solutions:
  • Mix half a cup of baking soda with one quart of warm water.
  • Pour it down the drain and let sit for at least an hour before rinsing.
  • Vinegar applications:
  • Pour 1/2 cup of vinegar into the drain.
  • After about 30 minutes, rinse with hot water.

These two remedies work wonders due to their odour-absorbing properties. But there’s more!

  • Lemons benefits:
  • Squeeze a lemon into the drain.
  • The citric acid will break down foul odour.
  • Essential oils usage:
  • Drop several drops of your favorite essential oil in the drain.
  • It serves as both an odour eliminator and leaves a pleasant scent behind.

Additionally, coffee grounds effectiveness is noteworthy since they absorb and eliminate smells. Just sprinkle some used coffee grounds around the drain area and leave them overnight.

With these natural methods, you’ve got smelly drains covered without resorting to harsh chemicals!

Professional Drainage Services

Even though natural remedies can be effective, there’s no denying the convenience and thoroughness of professional drainage services. These experts offer a comprehensive approach to your smelly bathroom floor drains problem, starting with a complete drainage system evaluation.

They’ll thoroughly inspect every aspect of your drain system to identify any blockages or issues that could be causing unpleasant odours.

Professional services, generally plumbers, also provide cost estimation for their work in advance. So you’ll know exactly what you’re getting into before any actual work begins. This transparency can give you peace of mind and help you budget appropriately for the necessary repairs or maintenance.

What’s more, many companies offer emergency services 24/7. If your bathroom floor drain is emitting an unbearable smell at odd hours, they are just one call away from fixing it. Furthermore, by entering into maintenance agreements with these professionals, you can ensure regular check-ups and service for your drains – preventing future problems before they arise.

They employ innovative solutions using advanced technology and tools to efficiently solve any drain issue. It’s not just about masking the smell; it’s about tackling the root cause of it to permanently eliminate this concern from your life.

So don’t hesitate; get in touch with professional drainage services today!

Preventive Measures for Odour Reoccurrence

You’ve called in the pros and they’ve done their job, but wouldn’t you want to avoid such foul situations in the future? Well, there are several preventive measures you can take to keep your bathroom floor drains smelling fresh and clean.

  • Use odour-absorbing materials: Things like activated charcoal or baking soda can be a godsend. Simply place them near the drain and let them work their magic.
  • Make ventilation improvements: Keep stale air moving by installing an exhaust fan or even just cracking a window open.
  • Implement moisture control strategies: Using dehumidifiers will help to reduce dampness that often contributes to musty odours.
  • Apply a high-quality sealant: This’ll prevent water from seeping into areas it shouldn’t.

Remember, nothing beats regular inspections of your plumbing system. By staying vigilant and proactive, you can nip any potential problems in the bud before they become full-blown issues.

So, don’t wait for another nasty surprise. Take these steps today and breathe easy knowing that your bathroom is not just squeaky clean but also smell-free!

If you’ve recently has your bathroom renovated, it’s also a good idea to get in contact with them to see if it is a problem they caused, or an issue they can rectify.

Frequently Asked Questions

What are the potential health risks associated with a smelly bathroom floor drain?

Odour sources like smelly drains can harbor various bacteria types, potentially causing respiratory issues. Mold dangers are real too, as damp conditions can trigger allergies. It’s crucial to address these health risks promptly.

Could a smelly bathroom floor drain indicate a more serious plumbing issue?

Yes, a smelly bathroom floor drain can indicate serious plumbing issues. Odour sources might be due to sewage backup requiring drain maintenance. It’s key for odor prevention and necessitates a thorough plumbing inspection.

How long does it typically take for a smelly bathroom floor drain to return to normal after treatment?

Depending on the odour sources, it might take a few days for your drain to smell normal after using homemade solutions. Regular drain maintenance and prevention techniques can lessen the odor impact over time.

Are there any specific products that can help mask the odour while I’m treating the problem?

Yes, you can use odour neutralizers or air purifiers. Homemade solutions like vinegar and baking soda are great too. Essential oils provide pleasant scents, while odor absorbing plants offer a natural fix.

Are there specific types of flooring that make bathroom floor drains more prone to odours?

Yes, certain flooring options like carpet can trap odour sources more than others. The drain materials can also affect the smell. Regular cleaning methods and odor prevention techniques can help reduce these issues.

Conclusion

You’ve got the tools to tackle smelly bathroom floor drains now. By identifying the odours source, regularly cleaning your drain, using natural remedies, or seeking professional help, you can eliminate those unpleasant smells.

Don’t forget about preventive measures either! It’s all about maintaining a fresh and clean bathroom environment. So roll up your sleeves, it’s time to bid farewell to those nasty odours for good!

flood damage

How To Approach A Water Damage Restoration Project

Any Australian homeowner – especially in South Australia – will tell you that our recent rain is a welcome change from a dreadful bushfire season and a decade of continual drought.

Water tanks are full to the brim, your backyard grass is noticeably greener, and skies are at last blue again.

But what happens when torrential rain leads to flooding in your home, leaks in your roof, on your newly laid carpet and clogs in your drain pipes?

The reality is that water damage may have been developing for years before the recent rain we’ve had. It just may have taken a downpour to make it apparent.


restore and repair water damaged floor

Common Causes Of Water Damage In Your Home

If you’ve recently had a bout of torrential rain, like most parts of South Australia have had, you’ll do anything to keep your home watertight. A leak or flood might come in the form of a stain across the ceiling or down the wall, or a noticeable and monotonous trickle of water in the kitchen that you can’t seem to get rid of.

Whether your home is two years old or 20, you’ll inevitably come into contact with leaks and minor floods. There are a number of reasons for this.

Some include:

Clogged gutters: Have you been neglecting to clean out the muddy layer of leaves and debris that have settled in your gutters? Not only can built-up debris be a fire hazard on dry, hot days, but without a clear path, water has no place to go. When it overflows, it can get into nooks and crannies in your roof, and potentially cause a leakage.

Ground floor flooding: The effect of flooding on your ground floor depends on a couple of factors; volume and duration. And sometimes there’s no way around it. When there’s heavy rain, water damage to certain structural parts of your home becomes vulnerable.

Exterior wall damage: If your gutters aren’t clear, water overflow will inevitably occur. When water overflows from roofing gutters, it will poor down exterior walls causing erosion of outer wall material.

Drainage issues: If yards aren’t exposed to proper drainage routes then excessive water build-ups will cause your foundations and exterior walls to become brittle.

The age of your roof: An old and poorly maintained roof will naturally be more likely to have a few broken or missing roof tiles. And, while roof tiles don’t rust, where there’s a valley in your roof, there’s an inviting spot for water to puddle. If your roof is a couple of decades old, its valleys will most likely be enforced with galvanized metal which can rust. Combine a valley with gum leaves and torrential rain, and you have a recipe for a leak.

Broken or missing tiles and shingles: They can be small, or they can be big, but if there is a hole in your tile or a loose shingle on your roof, then there’s the potential for water to sneak in and cause a rotting, leaky roof.

Skylights and roof vents: The second a hole is cut out of a roof for a skylight, it’s vulnerable to a roof leak. Cracked vents, poor sealing jobs, and carelessly installed skylights can also be causes of roof leaks.

So You’re Experiencing Water Damage – What To Do?

Step 1) Document the issue immediately. Whether you are a homeowner or a renter, it’s a good idea to keep photo or video documentation of the damage that’s occurred. This will help you track the rate of damage and assist your landlord or plumber in analyzing the speed and extent of the spread of the leak, clog or flood. It will also remind you to be on top of your roof maintenance!

Step 2) Call in the experts. All you need to do is Google “DIY solution to residential water damage” to find a shoddy solution to what can be a very complicated issue. Plywood, plastic, and tar should not be considered as trustworthy materials for home restoration projects.

Not only does this have the potential to create further damage if you don’t have the proper training or tools, but it also poses a serious danger for DIYers. It’s best to call in skilled plumbers, who can help assess and repair your damage at a professional level.

Besides, by the time you have seen the water stain on your ceiling, or seen the puddle on your floorboards, it’s a good bet that the problem needs professional intervention.

The truth is, only trusted professionals can fix complicated water damage issues and repairs with confidence.

A roof plumber can:

  • Find the dreaded root of the problem
  • Install metal roofing and rainwater goods if needed.
  • Inspect your roof flashing, gutters and walls and repair them they’re rusted or warped.
  • Check your gutters and downpipes.
  • Examine and repair metallic roof and wall claddings.
  • Evaluate if any further damage to your ceiling has occurred.
  • Check your plumbing to make sure there’s no clogs.
  • Help with the repair of any plaster damage or refer you to a certified plasterer.
  • Assess if there are mold or mildew issues.
  • Provide useful temporary solutions if required, while repairs are being carried out.

Mayfair Building Group are on call 24/7 and service a range of suburbs and outer regions in Adelaide, so you know there are always handy professionals available on-call and close-by.

Not only will Mayfair Building Group help with inspecting and repairing the damage, but we’ll also provide you with those helpful maintenance tips to prevent a future occurrence.

Talk to a trained professional at Mayfair today, whether it is to save you amid peril, or for any construction, building or renovation project issues you’re experiencing.

Sometimes, leaving it in the hands of professionals is the best thing you can do, and can save you money in the long run.