The short answer is this: 40cm on center. For most wood or composite decks, that’s your number.
But if you’re using thinner stuff, or putting the boards down at an angle, you gotta go closer. 30 cm on center. And no matter what, you check the local building codes first. Always.
Getting the on-center (or O.C.) spacing right for your deck joists is probably the most important thing you’ll calculate, I mean, it’s the whole foundation for the thing. It decides how the deck feels when you walk on it, whether it can handle a big party or a heavy snow, and if the building inspector is going to pass your work or make you tear it all down. If you get it wrong the whole deck will be bouncy and saggy and just… bad. So this is the guide that gets into the weeds, the engineering, the materials, and all the stuff that answers the big question of how far apart to put those joists, especially when you start doing weird stuff like adding a spa.
The Guts of It: Why You Can’t Just Guess on Spacing
This isn’t art class. You can’t just “feel it out.” Getting into building means understanding a little bit of the physics behind it all, because proper joist spacing is a safety calculation, not a style choice. The whole substructure, the joists, the beams, the posts, it’s all one big system designed to move weight from your feet down into the dirt, and the joist spacing is the main knob you can turn to control how that system works.
A deck has to hold up two kinds of weight:
- Dead Loads: This is just… the weight of the deck itself. The boards, the joists, the big heavy beams, railings, anything that’s screwed down permanently.
- Live Loads: People. Furniture. That giant planter your aunt gave you. Snow. This is the stuff that comes and goes. The code (usually the IRC) makes you build it to handle at least 40 pounds per square foot (PSF) of this stuff.
And the joists are what carry all that weight over to the beams. So how far apart they are changes everything about how the deck feels and performs.
What Happens When You Get It Wrong
Not following the rules on joist spacing is just asking for trouble. Big trouble.
- The Trampoline Effect: Joists too far apart means the deck boards have to span a bigger gap than they’re made for. Which is why you get that bouncy, spongy feeling under your feet. It’s not just weird, it’s the first sign of a weak deck.
- Sagging and Warping: Over time, those wide spans will make the deck boards droop between the joists. Looks terrible. Creates puddles and tripping hazards. This is a huge problem with composite and PVC decking, which can get soft in the sun and sag.
- Structural failure. This isn’t a joke; with a really heavy load, like too many people crowded in one spot, the boards themselves can just snap or the screws can rip right out.
- Failing Inspection: The town inspector has a rulebook, and “maximum joist spacing” is a big chapter. Get it wrong, and you’ll be ripping it all up. On your own dime.
- Voided Warranties: The company that made your expensive decking has installation rules for a reason. If you space your joists at 18 inches when the manual says 16 inches max, your warranty is officially trash.
Top Ten Things to Think About for a Strong Deck Frame
If you look at decks that last for decades, they all get the same things right. Joist spacing is kind of the thread that ties all these things together, you have to think about the whole system.
- What decking you’re using. The single biggest factor.
- The joist wood itself, the size, the grade, the species.
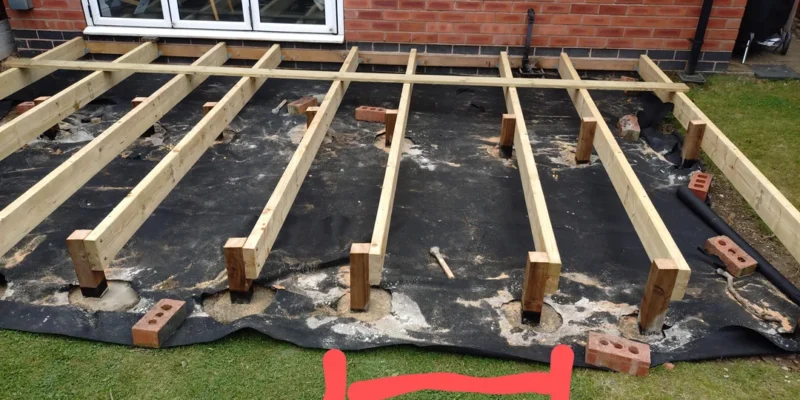
- Joist span. That’s the distance the joist travels between beams. It’s not the same as spacing. People always mix those up.
- Beams. What size, and where do they go?
- Ledger board. How you attach the deck to the house is critical. Seriously critical. Okay, stop. The ledger is probably the most important part of all. No, wait, the decking choice is first because it dictates the joist spacing from the get-go. But a bad ledger will bring the whole thing down. Anyway…
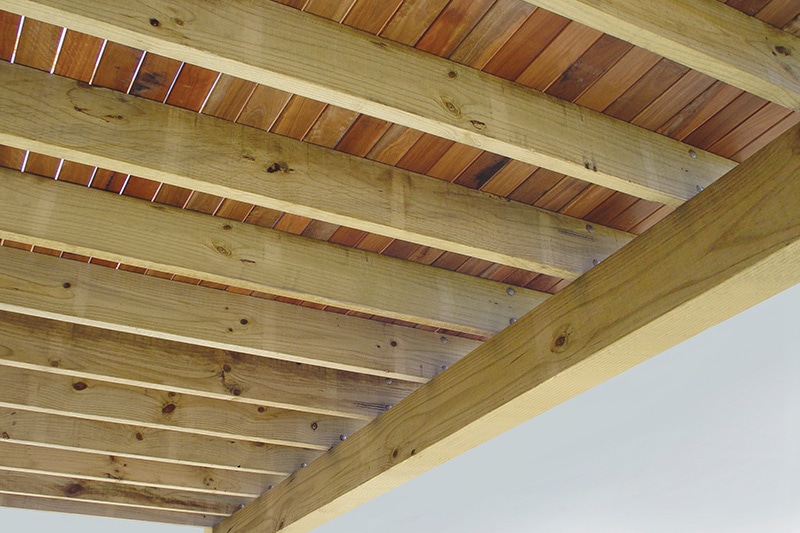
- Blocking and bridging. Those little pieces of wood between the joists? They’re not optional. They stop the joists from twisting.
- Cantilevers. That’s the part of the joist that hangs over a beam. There are strict rules about how far you can go.
- Hardware. Use the right metal connectors and hangers. Nails are not enough.
- Airflow underneath. You need to let the underside breathe or it’ll rot.
- Your local code. The final boss. Whatever the local inspector says, goes. End of story. Call your town’s building department and talk to someone, ask for Sharon if you’re in my town, she’s been there forever and knows the amendments by heart.
How Decking Material Messes With Your Spacing Plans
The boards you walk on have the biggest say in your joist spacing. Every material has a different stiffness. Some are strong, some are… flexible.
The bottom line.
So how far apart should they be? It depends on what you’re putting on top.
- Pressure-Treated (PT) Pine
- Standard 5/4 boards (~32 mm thick) can handle 400 mm on-center joist spacing with no problem.
- If you use 2×6 boards (~38 × 140 mm), you could stretch to 600 mm, but I wouldn’t. 400 mm just feels more solid underfoot.
- Cedar / Redwood
- Pretty much the same as PT pine.
- For 5/4 boards (~32 mm thick), use 400 mm on-center spacing.
- Composite Decking
- This material behaves more like plastic than wood, so it sags more.
- 400 mm on-center is the absolute maximum for most standard composite boards.
- For thinner, cheaper scalloped boards, you really need to drop to 300 mm on-center. No shortcuts here.
- PVC Decking
- All plastic, no wood fiber.
- Same rules as composite decking: 400 mm on-center is standard.
- Ipe and Other Tropical Hardwoods
- Extremely dense and strong. They could probably span 600 mm, but don’t do it.
- Stick with 400 mm on-center and the deck will feel rock-solid for decades.
Diagonal Decking is a Whole Different Ballgame
This is the part that trips everyone up. If you lay your deck boards at a 45-degree angle it looks great, but it completely changes the math of your structure.
When you put the boards on an angle, the actual space the board has to cross gets way bigger, it’s a geometry thing with triangles and stuff, so your 400mm spacing suddenly becomes more like 600mm inches which is way too much and the boards will feel super bouncy and sag over time so you have to pull the joists in to 300mm on center to make up for it.
Simple as that.
And you’ll need to add a ton of blocking, which are just short 2x pieces fit between the joists. You need them everywhere to support the ends of the boards where they meet.
Case Study 1: Building Stairs That Don’t Feel Flimsy
For standard 5/4 decking boards (~32 mm thick) used as stair treads, you should space the stringers 400 mm apart, but honestly 300 mm is much better so the stairs don’t flex.
If you’re using thick 2×12 treads (~38 × 285 mm), you have more leeway — maybe up to 600 mm stringer spacing.
For composite treads, manufacturers almost always specify 300 mm maximum stringer spacing. No exceptions.
And make sure you use proper metal stringer hangers/connectors to support the stringers. Never just nail them in place.
Case Study 2: Framing for a Spa (Don’t Do This the Normal Way)
A normal deck cannot hold a hot tub.
Let me repeat that: a normal deck frame – even with joists at 300 mm on-center, can completely fail under the weight of a hot tub. A filled tub with a few people can weigh over 2,000 kg. So the real question isn’t “how far apart are the joists?” – it’s “how do I build a second, mini-deck that’s ridiculously overbuilt?”
You need a dedicated grid of concrete footings directly under the hot tub area.
You’ll use very large beams, often built up from three 2×10s (~38 × 235 mm each) laminated together.
The joists under the tub should be larger, typically 2×10s (~38 × 235 mm), and spaced closer, around 300 mm on-center, sometimes even doubled.
You also need solid blocking between every single joist in that area.
You’re essentially building a separate, bomb-proof structure that just happens to sit at the same height as the rest of your deck. This is one of those times you really, really should consult a structural engineer.
Case Study 3: Outdoor Kitchens
Outdoor kitchens are tricky because the loads are heavy and unevenly distributed.
A granite countertop is extremely heavy, and a large grill creates a concentrated point load.
Under heavy countertops, reduce joist spacing to 300 mm on-center. Add extensive blocking directly under cabinet bases. You should double up joists beneath large grills or pizza ovens.
You also need to plan ahead for plumbing and electrical. You can’t just cut big holes in joists, you must frame around penetrations, essentially like creating a small window opening.
Paperwork and Plans
You need a real plan. On paper. For the municipality.
Not a sketch, a proper framing plan showing:
- Joist size, species, grade, and spacing (e.g. 38 × 235 mm No.2 PT pine at 400 mm O.C.)
- Beam sizes and locations
- Footing locations
- All connectors and hardware
You submit this before digging anything. The building department checks it against code, and if it passes, you get a permit. Do not skip this step.
Other Stuff You Should Know
It All Works Together
Span vs. Spacing, let’s be clear.
- Spacing = distance between joists (e.g. 400 mm)
- Span = distance a joist travels between supports (house to beam, beam to beam)
They directly affect each other. A 2×8 joist (~38 × 184 mm) at 400 mm spacing might span 3.6 m. Increase spacing to 600 mm, and that allowable span drops significantly. It’s always a trade-off.
Attaching to the House
The ledger board is where many decks fail , usually due to rot.
Use through-bolts wherever possible (better than lag screws), and always install proper flashing to keep water from getting behind the ledger.
Joist Tape
This is a newer practice, and it’s excellent.
Apply butyl joist tape to the top of joists and beams. It seals the wood and screw penetrations, keeping water out and dramatically extending the life of the framing. Use it.
A Few Last Questions…
Below we contemplate some questions customers ask us.
Does diagonal decking change joist spacing?
Absolutely.
If you planned 400 mm spacing for straight decking, you must reduce it to 300 mm on-center for diagonal layouts. The boards span farther at an angle and need extra support.
What happens if joists are too far apart?
Nothing good.
You’ll get a bouncy deck, sagging boards, and an uneven surface. Over time, this becomes a safety issue, including the risk of boards cracking underfoot. It’s simply a weak deck.
How does decking type affect joist spacing?
It’s one of the biggest factors.
- Wood decking is fairly stiff, 400 mm spacing usually works.
- Composite and PVC decking are more flexible and soften in heat, so they often require 300 mm spacing to prevent long-term sagging.
Always check manufacturer specs.
How far apart should joists be for a hot tub?
That’s a whole different level.
You need a specially engineered support system. Joists will typically be 300 mm apart or less, and much larger (2×10 or 2×12, ~38 × 235–285 mm). But that’s only part of it, you’ll also need more beams, more posts, and more footings, placed directly under the tub.
Don’t guess. The loads are massive.