I’m here to guide you through the daunting task of cleaning up after a bathroom renovation.
I’ve been there, dust and debris everywhere, feeling overwhelmed. But don’t worry! With the right approach and tools, I promise you can turn that construction zone into a sparkling sanctuary.
I’ll share my years of experience and personal tips and tricks, from dusting to deep cleaning, ensuring your newly renovated bathroom is free of remnants and ready for family use.
Always keep in mind that depending on the type of renovation and or cost, you may need council approval.
Let’s dive in!
Key Takeaways
- Clean and disinfect all surfaces, including the toilet, bathtub, sink, and vanity area.
- Remove any debris or construction materials from the bathroom before cleaning.
- Pay attention to detail and thoroughly clean hard-to-reach areas, such as corners and crevices.
- Replace shower curtains or liners if necessary to ensure a fresh and clean appearance.
Also see the video below on entire home cleaning after a renovation.
The Initial Clean-Up: Removing Large Debris
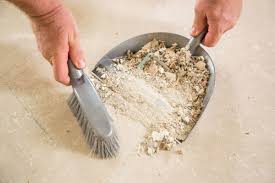
Before I can really get into the nitty-gritty of cleaning, I’ve got to remove any large debris that’s been left behind. This initial step in post renovation cleanup is crucial because it paves the way for a thorough and effective renovation cleaning.
I usually start by identifying the larger pieces of construction debris, like leftover building materials, chunks of plaster, and any tools or equipment left behind after the renovation project. Using heavy-duty gloves for protection, I carefully gather these items and dispose of them properly. This not only clears the space for detailed cleaning, but also eliminates potential safety hazards.
Essential Cleaning Supplies for Post-Renovation
I’ve found that having the right cleaning supplies is crucial for an efficient post-renovation cleanup.
My renovation cleaning checklist begins with microfiber cloths for dusting and scrubbing brushes for stubborn grime.
A good mop and bucket are essential for keeping floors clean. Cleaning solutions specific to the materials in your home, such as wood or tile, are also necessary.
Don’t forget the squeegee for keeping those newly installed windows sparkling.
For the bathroom, I keep a separate set of supplies. Strong disinfectants, a toilet brush, and a solution for keeping the taps and faucets clean are a must.
Though it’s a challenging task, if you’re feeling overwhelmed, don’t hesitate to bring in professional cleaners. They’ll have the job done in no time.
Tactics for Dusting and Vacuuming Post-Renovation
In post-renovation cleanups, it’s essential that one pays special attention to dusting and vacuuming, as these steps help to ensure any lingering dust and debris are thoroughly removed. I always start with a thorough dusting, focusing on high surfaces as fine dust tends to settle there. Next, I use my vacuum cleaner to pick up any dust that has fallen to the floor. This is a crucial step in my post-renovation cleaning checklist.
| Task | Importance | Tips |
|---|---|---|
| Dusting | Removes fine dust | Use a microfiber cloth |
| Vacuuming | Collects larger debris | Use attachments for hard-to-reach areas |
| Deep Clean | Ensures cleanliness | Use appropriate cleaning products |
| Empty Vacuum | Maintains efficiency | Do this regularly |
| Repeat | Catch any missed dust | Do this until no more dust appears |
Techniques for Cleaning Walls and Ceilings
While I’m scrubbing the walls, it’s important to remember that ceiling cleaning shouldn’t be overlooked, as dust and debris often collect there too. During the renovation process, ceilings, especially around ceiling fans, become a hotspot for dust accumulation. The cleaning process should hence, start from the top.
Firstly, I gently clean the ceiling fans using a damp cloth, ensuring not to damage any fixtures.
Secondly, I wipe the ceiling with a soft cloth, reaching every corner to ensure a thorough clean.
Lastly, I scrub the walls from top to bottom, paying attention to corners and edges.
Post-Renovation Window and Mirror Cleaning
After tackling the walls and ceilings, I’ve now got dozens of windows and mirrors to clean, but I’m well prepared with my streak-free glass cleaner and microfiber cloths.
My first step in post construction cleaning is to use a dry cloth to wipe off any residual dust from the glass surfaces. Then, I spray a generous amount of window cleaner on the surface and wipe it clean with a microfiber cloth. It’s important to use circular motions to avoid streaks.
For mirrors, it’s pretty much the same process. But remember, post construction cleaning isn’t like regular cleaning. It’s more detailed and time-consuming. So take your time, be thorough, and your windows and mirrors will be spotless and streak-free in no time.
Deep Cleaning Floors After Renovation
I’ve got both tile and hardwood floors throughout my house, and each requires a different method for deep cleaning after renovation. Post-construction cleanup is essential to remove construction dust and restore my floors to their original beauty.
Here’s my method for cleaning tiles:
- I start by mixing hot water with a mild detergent.
- Then, I gently mop the floors using the solution.
- For stubborn grout stains, I use a soft brush to scrub them away.
And here’s my method for cleaning hardwood floors:
- First, I sweep the floors to remove any dust and debris.
- Then, I use a wood-friendly cleaner and a microfiber mop to clean the hardwood.
Post-renovation, the sense of accomplishment is immense. But remember, deep cleaning is vital. It not only enhances your renovated space but also ensures the health and safety of your family. It’s like the cherry on top of your renovation project!
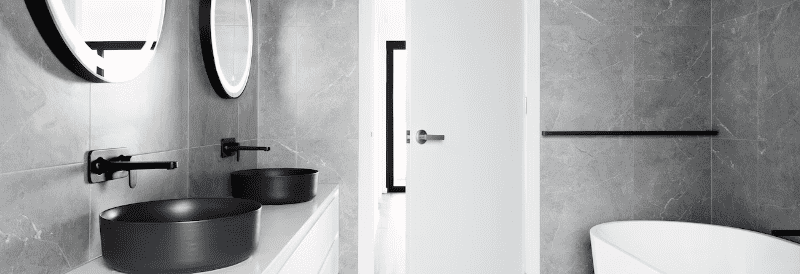
How to Clean Renovated Bathroom Fixtures
In cleaning my renovated bathroom fixtures, I’m using a mild, non-abrasive cleaner for the metal parts. I’m making sure to rinse them thoroughly to prevent residue build-up.
It’s crucial to give them a thorough clean, especially the light fixtures which can collect a lot of dust. I’m careful to remove all remaining dirt, paying close attention to detail.
For the post construction clean, I’ve found it’s best to follow up with a professional cleaning service. They have the expertise to ensure every nook and cranny is spotless.
Their thoroughness gives me peace of mind that my renovated bathroom isn’t just visually appealing, but hygienically clean as well. It’s a process, but the sparkling end result is worth it.

Sanitizing Bathroom Surfaces: A Step-by-Step Guide
I’m about to dive into the step-by-step process of sanitizing bathroom surfaces to ensure a healthy and germ-free environment. As part of a deep post construction clean, the bathroom is one area that needs meticulous attention. After the initial clean up of dust and other debris, we need to get down to the nitty-gritty.
- Scrubbing the tiles with a strong, but non-abrasive cleaner
- Disinfecting the sink, shower, and tub
- Thoroughly cleaning the toilet, both inside and out
Each of these steps is crucial in the post construction cleaning checklist to ensure all surfaces aren’t just visibly clean, but also sanitized. It’s not just about creating a shiny appearance, but more about securing a safe, hygienic space for all.
Tips for Cleaning Bathroom Furniture After Renovation
After you’ve scrubbed tiles and disinfected surfaces, it’s essential to pay attention to bathroom furniture as well, as these items can often harbor dust and debris from the renovation process.
Post construction cleans are a time-consuming process, but they’re necessary. Start with a dry microfiber cloth to remove the fine particles. Use this on shelves, cabinets, and mirrors.
Next, a slightly damp cloth will help you pick up stubborn dust. Don’t forget to clean underneath and behind the furniture. If your furniture has any metal parts, use a suitable cleaner to prevent rust.
Regularly shake out and change your cleaning cloths to avoid spreading dust around. Remember, the construction process can leave behind more mess than you’d think, so don’t rush this step.
Light Fixtures and Outlet Cleaning Post-Renovation
I’ve got quite a few light fixtures and outlets to clean post-renovation, and it’s critical to ensure they’re dust-free and safe to use. As part of post-construction cleanup, it’s important to take precautions to handle dust particles and debris effectively.
The mere thought of a newly renovated space filled with dust and grime is so unsettling.
The idea of a spark from an outlet clogged with dust is downright dangerous.
The vision of clean, sparkling light fixtures and outlets, ready for use, is satisfying.
Start by turning off the power for safety. Using a soft microfiber cloth, gently clean the dust from light fixtures. For outlet cleaning, a small brush can get into crevices. Remember, the post-renovation cleanup is just as important as the renovation itself.
How to Disinfect and Deodorize the Renovated Bathroom
It’s crucial to properly disinfect and deodorize the renovated bathroom to ensure a clean and pleasant environment.
I start by donning my personal protective equipment to keep safe.
I then use a high efficiency particulate air vacuum to remove as much dust as possible from all surfaces.
Next, I focus on cleaning air vents, knowing how they can harbor dust and contribute to odors if not properly cleaned.
A mixture of warm water and mild detergent does the trick, followed by a thorough rinse.
To ensure the air is clean, I replace the air filter with a new one.
Lastly, I use a high-quality disinfectant to wipe down all surfaces, following this up with a deodorizing spray.
With this, I’m confident my renovated bathroom isn’t just visually appealing, but truly clean and fresh.
Guidance for Final Inspection After Cleaning
I’m preparing for the final inspection after cleaning, and I’ll be focusing on ensuring every nook and corner is spotless. This task is a critical final step in the renovation process, after a bustling construction site has transformed into a renovated space.
Here’s my plan:
- First, I’ll revisit the cabinet doors. I’ll make sure they’re free from dust and grime both inside and out.
- Next, I’ll scrutinize the door frames. These often overlooked areas can collect dust and need careful cleaning.
- Finally, I’ll vacuum the carpets (if any). Out comes the heavy-duty vacuum cleaner for one last run.
Throughout this process, I’ll strategically use drop cloths to prevent any dislodged dust from resettling. It’s a meticulous process, but the end result – a spotlessly clean renovated space – will be worth it.
The Role of Professional Cleaners in Post-Renovation Cleaning
In my experience, hiring professional cleaners after a renovation can save countless hours of cleanup and they’ll often catch those easily overlooked spots. They’re well-equipped to handle the daunting task of cleaning up drywall dust, a notorious nuisance that finds its way into the tiniest nooks and crannies. It’s worth adding them to your bathroom renovation budget.
They’ll expertly clean your air con system and air ducts, preventing the dust from circulating in your home. You don’t realize the importance of this until you’re sneezing from the dust kicked up by your heating system! They also take care of removing the plastic sheeting used to protect your furniture and ensure all your air vents are dust-free.
I can’t stress enough how much easier it’s to let the pros handle the post-renovation cleanup.
Safety Measures During Post-Renovation Cleaning
While someone might think post-renovation cleaning is a breeze, I’ve found that ensuring safety measures are followed is just as important as the cleaning process itself. It’s not just about wiping all the dust off the soft surfaces, but it’s also about ensuring you’re protected while doing so.
- Always wear a mask and gloves to prevent inhaling loose dust or getting cut by broken glass.
- It’s crucial to wait until the dust settles before attempting to clean; rushing can stir up particles, making them more dangerous.
- Lastly, never underestimate the importance of proper disposal. You don’t want to leave any potential hazards lying around.
In the end, safety is just as important as a clean, dust-free home.
The Importance of Regular Maintenance After Renovation
Even though the renovation’s done and everything looks brand new, it’s crucial that I don’t neglect regular maintenance to keep it all in top shape. I’ve created a simple, effective routine that keeps my space looking its best. The ceiling fan, a usual dust gatherer, gets a weekly wipe down. For flat surfaces, a quick daily dusting does wonders in maintaining their sheen.
| Maintenance Task | Frequency |
|---|---|
| Cleaning Ceiling Fan | Weekly |
| Dusting Flat Surfaces | Daily |
| Deep Cleaning | Monthly |
| Maintenance Check | Quarterly |
This routine is fundamental for identifying issues early on, preventing unnecessary wear and tear. It ensures that my renovated space will age gracefully, retaining its charm and appeal for years to come. Regular maintenance – it’s a small commitment for a lasting reward.
Popular Questions
How Do I Clean Grout Between Tiles After Renovation?
To clean grout between tiles after a renovation, I’d start by vacuuming to remove loose debris. I’d then make a paste of baking soda and water, apply it to the grout, and scrub it clean.
What Precautions Should I Take When Cleaning Newly Installed Bathroom Appliances?
When cleaning newly installed bathroom appliances, I’m careful not to scratch or damage them. I use soft cloths and non-abrasive cleaners. I also ensure they’re dry after cleaning to prevent water spots or damage.
How Do I Remove Paint or Adhesive Stains From Surfaces After Renovation?
To remove paint or adhesive stains after renovation, I’d first identify the type of surface. Then, I’d gently scrape off excess residue before applying a suitable cleaning solution. Always test on a hidden area first.
How Often Should I Clean the Bathroom After a Renovation to Keep It in Optimal Condition?
I’d suggest cleaning your renovated bathroom thoroughly once after completion, then maintaining it with weekly cleans. This ensures it stays in prime condition and any renovation dust or debris is regularly cleared.
Are There Any Specific Cleaning Products Recommended for Post-Renovation Cleaning in Bathrooms?
Yes, for post-renovation bathroom cleaning, I’d recommend a multi-surface cleaner for general surfaces, a non-abrasive cleaner for delicate areas, and a mold/mildew remover for damp areas. Always read labels for specific usage instructions.
Final Notes
In conclusion, cleaning your bathroom after renovation can feel like a daunting task, but it’s doable with a systematic approach and the right tools. Remember, patience and diligence will get the job done.
Don’t rush; take the time to ensure each area is thoroughly cleaned. If it feels too overwhelming, professional cleaners are always an option.
And finally, establish a regular cleaning routine to keep your renovated bathroom sparkling clean and inviting.